iTag - Photo Tagging Software
Getting Started
Photos can be loaded into the panel in several different ways
- Drag and drop files or folders from Windows Explorer
- On the toolbar, click the Load Files icon
 . This option lets you select specific files that you wish to tag.
 - On the toolbar, click the Load Folder icon
 . This lets you load a whole folder or the whole folder and all of its subdirectories
Tip: It is difficult to add meaningful tags across a large set of photos. Try working with a small batch of 30 or so related photos at one time.
Once you have loaded some images into iTag, you may want to resize, zoom or sort them.
- Drag the slider on the toolbar to adjust the size of the thumbnails.

- Drag the slider all the way to zero to see the photos in a grid.

Photos can be sorted by right clicking and selecting sort or group in both thumbnail and grid views.

iTag can work with most RAW formats including NEF and CRW, however you must have the appropriate Windows codec installed in order to render thumbnails.
Click here to download the Microsoft Camera Codec Pack.
Sometimes it is difficult to see the detail in a small thumbnail. To view a photo in fullscreen
- Select the photo you are interested in
- Press Alt-Z
If you have completed tagging a set of photos and are satisfied with the results, prepare to load new photos by unloading the current set.
- Select the photos to unload
- Right click and select Remove
By design, iTag's photo panel does not mirror the Windows Explorer layout and directory browsing functions. There are however a small set of file manipulation commands available.
- Delete one or several files by selecting them and pressing the delete key. You will be prompted to continue and the file will be moved to the Recycle Bin.
- Copy files by dragging them out of iTag and into Windows Explorer. This is useful to copy a set of files found after a search result where you will compress them for emailing and don't want the originals touched.
Tagging
Tagging is very straight forward.
- First, select one or more photos.
- Where possible select multiple photos that have a common feature that you wish to tag
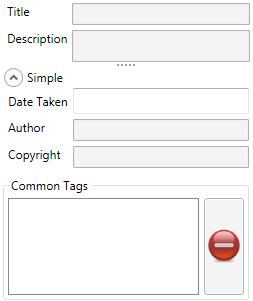
- Add a title and/or description

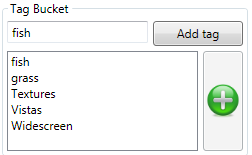
- Type a tag into the textbox in the tag bucket and hit enter

- If there is already a tag in the bucket, select it and click the green (+) button to add it to the selected photo
- When a new tag is added, it will appear in the Common Tags list for the selected photos
If you were taking photos in the backyard and a few of them had photos of your pet dog then you should highlight all of those photos and then add the tag Rover once. You could of course do this for each photo - it is just more efficient to do it once for all photos.
The common tags list shows all tags that are in common between the selected photos. If you select all photos of Rover, then you should see the Rover tag is common. If you select a photo of rover and also a picuture of a bronze statue of a horse, there is very little common between these photos so you may expect to see zero common tags.
Tip: Move between photos using the Alt-Left Arrow and Alt-Right Arrow keys. These keys will work even if your cursor is in a tagging textbox.
iTag does not automatically save photos, you must manually do this by clicking the save icon

If you are closing iTag or unloading photos that have not been saved, iTag will always prompt you to save before exit.
If you have a GPS tracklog and wish to geotag photos, then a tool such as GeoSetter should be used.
If you dont have a GPS tracklog, then iTag supports using Google Earth to quickly geocode a single or multiple files.
- Open Google Earth and find the place that you took the photo.
- Add or drop a placemark and then right click and select Copy
- Your clipboard now contains KML detailing the place of interest
- Switch back to iTag and select the photos you wish to geocode.
-
Click the Geocode button

- iTag will detect the KML in the clipboard and prompt you to use it. Select OK
- Your photos will now be geocoded with a latitude and longitude.
- Geocoded photos will appear with a small globe
 in the bottom corner
A small globe  in the bottom corner of a photo indicates a geocoded photo.
Geocoded photos can be loaded into Google Earth.
- Select one or more geocoded photos
- Click the View in Google Earth toolbar button.

Tip: For more advanced control over the export, use the File menu and select Export to Google Earth. A dialog will appear where more detailed aspects of the export can be controlled.
Searching
Before you can perform a search, you need to build an index.
This scans all of your photos for metadata and saves it into a small database to make the searches super fast.
Build the index by
- Clicking Edit, Options and then Search
- Pick the folder that contains all of your photos and then click Rebuild Index
It will take a few minutes for the index to build, but you need only perform this once. As you edit your photos, the index will be automatically updated when the photos are saved.
(Note that your metadata is still always saved to the IPTC headers of the photo file - so your metadata remains portable)
Once you have constructed the search index (see above), you are ready to search.
- Switch iTag into search mode by pressing the Search Mode button on the toolbar
- Enter your search terms into the textbox and click Search
For more powerful searching, click Advanced and use the Query Builder to:
- Add negative/anti words
- Search by a rating
- Search geocoded photos via an address
A third search method is to click words in the tag cloud. Words in the tag cloud appear larger the more frequently they occur. This scaling of word size can be adjusted by right clicking inside a blank area of the cloud and changing the scaling and maximum font size.
Premium Edition
If you purchase a licence to use iTag for personal use, you are entitled to install the license on up to 3 computers simultaneously.
Commercial users should purchase one licence per installation of iTag. For example if you have 10 PC's with iTag installed then you should purchase 10 licences.
To obtain the premium version of iTag:
- Download the free version
- Purchase a licence where you will be supplied with a link to a personalised licence file
- Download the licence file to your local computer
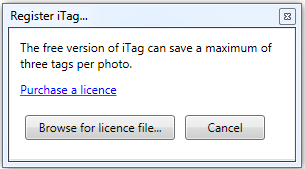
- In iTag, click Help, Register iTag...

- Browse for the licence file you just downloaded and iTag will be activated

- Ensure you make a backup of the licence after your purchase